Area
English below
| Chức năng (Function description) | Tính năng Area configuration trên sub-tab Area (màn hình Room) trong PMS cho phép bạn thiết lập và quản lý danh sách khu vực trong khách sạn, hỗ trợ tổ chức dữ liệu theo Facility và Floor, đồng thời cung cấp các thao tác như thêm, lưu, xóa và tìm kiếm để phục vụ cấu hình phòng, hạng phòng và báo cáo. |
|---|---|
| Phiên bản (Version) | v1.0 |
| Ngày tạo (Created at) | Apr 3, 2026 |
| Điều kiện sử dụng (Prerequisites) | Thiết bị đã được whitelist IP address, có VPN và có kết nối mạng ổn địnhĐã có tài khoản đăng nhập vào PMS. Trường hợp người dùng chưa có tài khoản, cần liên hệ Support team hoặc Admin để tạo tài khoản.Người dùng đã được phân quyền sử dụng chức năng Config rooms |
I. Giới Thiệu và Mục Tiêu
1. Giới thiệu
Tính năng Area configuration trên sub-tab Area (màn hình Room) trong PMS cho phép bạn thiết lập và quản lý danh sách các khu vực (Area) trong khách sạn. Mỗi khu vực đại diện cho một phân vùng cụ thể trong từng Facility (ví dụ: khu A, khu B, khu VIP…), giúp tổ chức hệ thống phòng một cách rõ ràng và logic.
2. Mục tiêu
- Chuẩn hóa cấu trúc quản lý phòng theo mô hình: Facility → Area → Floor → Room.
- Hỗ trợ phân loại và quản lý phòng theo khu vực thực tế
- Làm nền tảng cho các cấu hình liên quan như: Room, Room Class, Floor
- Tăng tính chính xác và hiệu quả trong vận hành, tìm kiếm và báo cáo
II. Các Tính Năng Chính
- Quản lý danh sách Area
Hiển thị danh sách tất cả các khu vực đã được tạo trong hệ thống, hỗ trợ theo dõi và quản lý tập trung. - Tạo mới Area
Cho phép bạn thêm mới khu vực với đầy đủ thông tin như tên khu vực, Facility, danh sách tầng và mô tả. - Chỉnh sửa thông tin Area
Dễ dàng cập nhật thông tin khi có thay đổi về cấu trúc hoặc nhu cầu vận hành. - Xóa Area
Xóa các khu vực không còn sử dụng (có thể áp dụng điều kiện ràng buộc nếu đã phát sinh dữ liệu liên quan). - Tìm kiếm Area
Hỗ trợ tìm kiếm nhanh theo tên khu vực giúp tiết kiệm thời gian thao tác.
III. Các Bước Thao Tác Cơ Bản Trên Màn Hình
Dưới đây là các bước thao tác tiêu chuẩn để sử dụng chức năng. Thực hiện theo thứ tự để đảm bảo hiệu quả.
- Truy cập màn hình Area configuration
- Đăng nhập vào hệ thống PMS.
- Nhấn vào menu “Config” trên thanh Header.
- Chọn Config > Room > Area.
- Hệ thống hiển thị màn hình Area configuration.
- Tạo mới Area
- Nhấn nút Add
- Nhập các thông tin cần thiết:
- Name: Tên khu vực
- Facility name: Chọn tòa nhà tương ứng
- Floors: Chọn các tầng thuộc khu vực
- Description: Nhập mô tả (nếu cần)
- Nhấn Save để lưu thông tin
- Chỉnh sửa Area
- Chọn khu vực cần chỉnh sửa từ danh sách
- Cập nhật thông tin mong muốn
- Nhấn Save để lưu thay đổi
- Xóa Area
- Chọn khu vực cần xóa
- Nhấn Delete
- Xác nhận thao tác xóa
- Tìm kiếm Area
- Nhập từ khóa vào ô Search
- Hệ thống hiển thị danh sách kết quả phù hợp theo tên Area.
IV. Mô Tả GUI (Giao Diện Người Dùng)
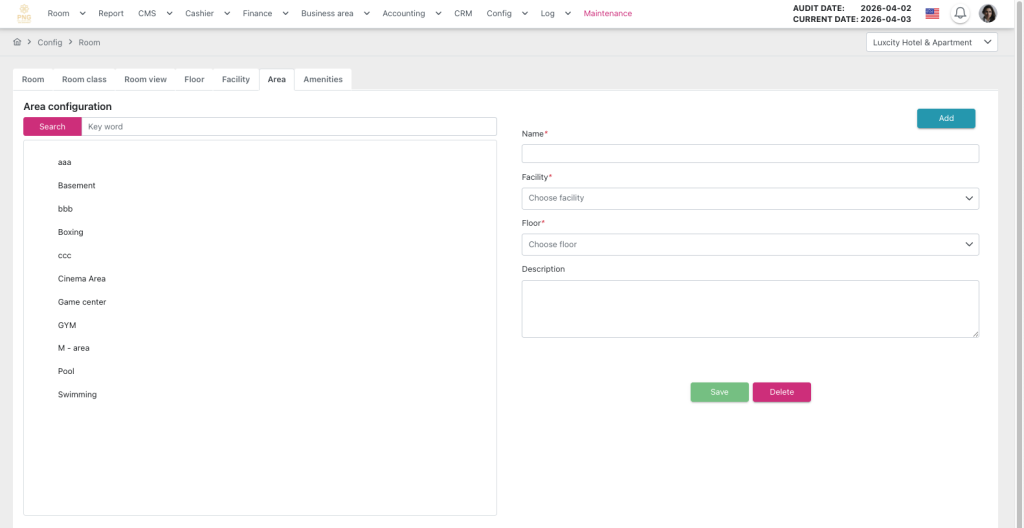
Màn hình Area configuration gồm:
- Header:
- Hiển thị thông tin ngày audit hiện tại và các chức năng chính của màn hình như điều hướng menu, truy cập nhanh các thao tác quản lý hóa đơn.
- Khu vực danh sách (Area List)
- Hiển thị danh sách các Area dưới dạng danh sách hoặc bảng
- Thông tin hiển thị chính:
- Area Name (Tên khu vực)
- Cho phép click vào từng dòng để xem chi tiết hoặc chỉnh sửa
- Màn hình khởi tạo / Chi tiết:
- Bao gồm các trường thông tin:
- Name
- Kiểu dữ liệu: Text
- Bắt buộc nhập
- Dùng để định danh khu vực
- Facility name
- Kiểu dữ liệu: Dropdown
- Bắt buộc chọn
- Hiển thị danh sách các Facility đã được cấu hình trước đó
- Floors
- Kiểu dữ liệu: Multi-select / Dropdown
- Cho phép chọn một hoặc nhiều tầng thuộc khu vực
- Description
- Kiểu dữ liệu: Text (optional)
- Dùng để mô tả thêm thông tin về khu vực
- Name
- Bao gồm các trường thông tin:
- Khu vực thao tác (Action Buttons)
- Add: Mở form tạo mới Area
- Save: Lưu thông tin khi tạo mới hoặc chỉnh sửa
- Delete: Xóa Area đang được chọn
- Search: Ô nhập liệu để tìm kiếm theo tên Area
- Trạng thái & Hành vi hệ thống
- Hiển thị thông báo khi:
- Lưu thành công / thất bại
- Xóa thành công / thất bại
- Kiểm tra dữ liệu đầu vào:
- Không cho phép lưu khi thiếu trường bắt buộc
- Hiển thị thông báo khi:
| Function description | The Area configuration feature on the Area sub-tab (Room screen) in the PMS allows you to set up and manage the list of areas within the hotel, supports organizing data by Facility and Floor, and provides actions such as Add, Save, Delete, and Search to facilitate Room, Room Class configuration, and reporting. |
|---|---|
| Version | v1.0 |
| Created at | Apr 3, 2026 |
| Prerequisites | The device must have a whitelisted IP address, a VPN, and a stable internet connection.The user must have a PMS account. If the user does not have an account, contact the Support team or Admin to create one.The user must be Config rooms function. |
I. Introduction and Objectives
1. Introduction
The Area configuration feature on the Area sub-tab (Room screen) in the PMS allows you to set up and manage the list of areas within the hotel. Each area represents a specific subdivision within a Facility (e.g., Area A, Area B, VIP Area), helping to organize the room system clearly and logically.
2. Objectives
- Standardize room management structure following the model: Facility → Area → Floor → Room
- Support classification and management of rooms according to actual areas
- Serve as a foundation for related configurations such as Room, Room Class, and Floor
- Enhance accuracy and efficiency in operations, searching, and reporting
II. Primary features
- Area List Management
Displays all existing areas in the system, supporting centralized monitoring and management. - Add New Area
Allows you to create a new area with complete information including area name, Facility, list of floors, and description. - Edit Area Information
Easily update information when there are changes in structure or operational needs. - Delete Area
Remove areas that are no longer in use (constraints may apply if related data exists). - Search Area
Quickly search by area name to save time in operations.
III. Basic operations on the screen
Follow the steps below in order to ensure efficient and accurate operation.
- Access the Area Configuration Screen
- Log in to the PMS system.
- Click the Config menu on the header.
- Navigate to Config > Room > Area.
- The system will display the Area configuration screen.
- Add New Area
- Click the Add button.
- Enter the required information:
- Name: Area name
- Facility name: Select the corresponding Facility
- Floors: Select floors belonging to the area
- Description: Enter additional description (optional)
- Click Save to save the information.
- Edit Area
- Select the area you want to edit from the list.
- Update the desired information.
- Click Save to apply changes.
- Delete Area
- Select the area to delete.
- Click Delete.
- Confirm the deletion action.
- Search Area
- Enter a keyword in the Search box.
- The system displays a list of matching results by Area name.
IV. GUI Description (User Interface)

The Area configuration screen includes:
- Header
- Displays current audit date and key screen functions such as menu navigation and quick access to management actions.
- Area List
- Shows all areas in a list or table format.
- Main information displayed:
- Area Name
- Allows clicking each row to view details or edit.
- Create / Detail Screen: Includes the following fields:
- Name
- Data type: Text
- Required
- Used to identify the area
- Facility name
- Data type: Dropdown
- Required
- Displays all pre-configured Facilities
- Floors
- Data type: Multi-select / Dropdown
- Allows selecting one or more floors belonging to the area
- Description
- Data type: Text (optional)
- Used to provide additional information about the area
- Name
- Action Buttons
- Add: Opens the form to create a new area
- Save: Saves information when creating or editing
- Delete: Deletes the selected area
- Search: Input box to search by Area name
- System Status & Behavior
- Displays notifications when:
- Save is successful / failed
- Delete is successful / failed
- Input validation:
- Saving is not allowed if required fields are missing
- Displays notifications when:
V. General Instructions and Support
- Usage tips:
- Always carefully check the figures before and during running Night Audit.
- Ensure that all mandatory steps have been completed.
- Support: If you encounter a problem, contact email support@airfeedkh.com.
- Updates: This guideline may change. Please check the latest version in the “Help” section.