Classification
English below
| Chức năng (Function description) | Tính năng Classification trên màn hình Outlet giúp người dùng phân loại và sắp xếp món ăn/dịch vụ theo từng nhóm rõ ràng, từ đó dễ dàng quản lý menu, hiển thị chính xác trên hóa đơn và hỗ trợ vận hành hiệu quả hơn. |
|---|---|
| Phiên bản (Version) | v1.0 |
| Ngày tạo (Created at) | Mar 30, 2026 |
| Điều kiện sử dụng (Prerequisites) | Thiết bị đã được whitelist IP address, có VPN và có kết nối mạng ổn địnhĐã có tài khoản đăng nhập vào PMS. Trường hợp người dùng chưa có tài khoản, cần liên hệ Support team hoặc Admin để tạo tài khoản.Người dùng đã được phân quyền sử dụng chức năng Config Outlet |
I. Giới Thiệu và Mục Tiêu
1. Giới thiệu
Tính năng Classification trên sub-tab Classification (màn hình Outlet) trong PMS cho phép người dùng cấu hình và phân loại món ăn/dịch vụ theo cấu trúc phân tầng từ Business Area → Outlet → Parent Class → Child Class, giúp tổ chức dữ liệu menu một cách logic, hỗ trợ hiển thị trên bill và tối ưu vận hành.
2. Mục tiêu
- Cho phép quản lý và phân loại món ăn/dịch vụ theo cấu trúc rõ ràng.
- Hỗ trợ hiển thị thông tin chính xác trên bill thanh toán.
- Tối ưu hóa việc quản lý menu theo từng outlet và business area.
- Tạo nền tảng dữ liệu chuẩn cho các module liên quan (order, báo cáo, vận hành).
II. Các Tính Năng Chính
- Quản lý cấu trúc Classification:
- Hiển thị danh sách classification theo dạng phân tầng:
- Business Area (FnB, KTV, Spa) > Outlet > Parent Class > Child Class
- Hiển thị danh sách classification theo dạng phân tầng:
- Quản lý Parent Class:
- Tạo, chỉnh sửa và xóa parent class.
- Thông tin bao gồm: Class code, Class name, Business area, Outlet, Description.
- Quản lý Child Class:
- Tạo, chỉnh sửa và xóa child class.
- Thông tin bao gồm: Business area, Outlet, Parent class, Priority order, Class code, Class name, Description, Service.
- Gán Service vào Child Class:
- Hiển thị danh sách món ăn/dịch vụ dưới dạng checkbox.
- Cho phép chọn nhiều service để gán vào child class.
- Tìm kiếm và thao tác nhanh:
- Tìm kiếm classification theo tên hoặc mã.
- Các nút thao tác: Save, Delete, Add Parent, Add Child.
- Đồng bộ và kiểm soát dữ liệu:
- Đảm bảo service được gán đúng vào child class.
- Dữ liệu được sử dụng xuyên suốt trong các module như order, bill và báo cáo.
III. Các Bước Thao Tác Cơ Bản Trên Màn Hình
Dưới đây là các bước thao tác tiêu chuẩn để sử dụng chức năng. Thực hiện theo thứ tự để đảm bảo hiệu quả.
- Truy cập màn hình Menu
- Đăng nhập vào hệ thống PMS.
- Nhấn vào menu “Config” trên thanh Header.
- Chọn Business area > Outlet > Classification.
- Hệ thống hiển thị màn hình Classification.
- Xem danh sách classification:
- Danh sách hiển thị theo cấu trúc phân tầng: Business Area (FnB, KTV, Spa) > Outlet > Parent Class > Child Class
- Click vào item để xem chi tiết.
- Tạo Parent Class:
- Nhấn Add Parent.
- Nhập các thông tin: Class code, Class name, Business area, Outlet, Description.
- Nhấn Save để lưu.
- Tạo Child Class:
- Chọn Parent Class tương ứng.
- Nhấn Add Child.
- Nhập các thông tin: Business area, Outlet, Parent class, Priority order, Class code, Class name, Description.
- Chọn service bằng checkbox.
- Nhấn Save để lưu.
- Chỉnh sửa Classification:
- Chọn parent hoặc child class cần chỉnh sửa.
- Cập nhật thông tin trong form chi tiết.
- Nhấn Save để lưu thay đổi.
- Xóa Classification:
- Chọn parent hoặc child class cần xóa.
- Nhấn Delete và xác nhận thao tác.
- Tìm kiếm:
- Nhập từ khóa vào ô Search để lọc nhanh danh sách.
IV. Mô Tả GUI (Giao Diện Người Dùng)

H.1.0. Màn hình thêm mới parent class

H.1.1. Màn hình thêm mới child class
Màn hình Classification gồm:
- Header:
- Hiển thị thông tin ngày audit hiện tại và các chức năng chính của màn hình như điều hướng menu, truy cập nhanh các thao tác quản lý hóa đơn.
- Khu vực danh sách classification:
- Hiển thị theo dạng tree (phân tầng) từ Business Area đến Service.
- Cho phép expand/collapse từng cấp.
- Hỗ trợ click chọn nhanh để xem chi tiết.
- Khu vực form chi tiết:
- Hiển thị khi chọn hoặc thêm mới Parent/Child Class.
- Đối với Parent Class:
- Class code: Mã định danh của Parent Class, dùng để phân biệt và quản lý giữa các nhóm phân loại trong hệ thống.
- Class name: Tên của Parent Class, thể hiện nội dung hoặc nhóm món ăn/dịch vụ mà class đại diện.
- Business area: Khu vực kinh doanh mà Parent Class thuộc về (ví dụ: FnB, KTV, Spa), giúp phân loại theo từng mảng hoạt động.
- Outlet: Cửa hàng/chi nhánh áp dụng Parent Class, đảm bảo dữ liệu được quản lý theo từng địa điểm cụ thể.
- Description: Thông tin mô tả thêm cho Parent Class, giúp người dùng hiểu rõ mục đích và cách sử dụng của nhóm phân loại này.
- Đối với Child Class:
- Business area: Khu vực kinh doanh mà Child Class thuộc về (ví dụ: FnB, KTV, Spa), giúp phân loại theo từng mảng hoạt động.
- Outlet: Cửa hàng/chi nhánh áp dụng Child Class, đảm bảo dữ liệu được quản lý theo từng địa điểm cụ thể.
- Parent class: Nhóm phân loại cấp cha mà Child Class trực thuộc, dùng để tổ chức dữ liệu theo cấu trúc phân cấp.
- Priority order: Thứ tự ưu tiên hiển thị của Child Class trong danh sách, giúp sắp xếp các nhóm theo mong muốn.
- Class code: Mã định danh của Child Class, dùng để phân biệt và quản lý giữa các nhóm trong hệ thống.
- Class name: Tên của Child Class, thể hiện nội dung hoặc nhóm món ăn/dịch vụ cụ thể.
- Description: Thông tin mô tả thêm cho Child Class, giúp người dùng hiểu rõ mục đích sử dụng.
- Service (checkbox list): Danh sách các món ăn/dịch vụ hiển thị dưới dạng checkbox, cho phép người dùng chọn một hoặc nhiều service để gán vào Child Class.
- Khu vực nút thao tác:
- Add Parent: Tạo mới một Parent Class để phân loại nhóm món ăn/dịch vụ ở cấp cao hơn.
- Add Child: Tạo mới một Child Class thuộc Parent Class đã chọn để phân loại chi tiết hơn các món ăn/dịch vụ.
- Save: Lưu thông tin khi thêm mới hoặc chỉnh sửa Parent Class hoặc Child Class.
- Delete: Xóa Parent Class hoặc Child Class đang được chọn (có hiển thị popup xác nhận trước khi thực hiện).
- Search: Tìm kiếm nhanh Parent Class hoặc Child Class theo tên để dễ dàng tra cứu và quản lý.
- Trạng thái và phản hồi hệ thống:
- Hiển thị thông báo khi thêm, sửa, xóa thành công hoặc lỗi.
- Popup xác nhận khi thực hiện thao tác xóa.
- Validation hiển thị trực tiếp tại các trường nhập liệu.
- Tính thân thiện và tối ưu trải nghiệm:
- Giao diện trực quan, dễ sử dụng.
- Quản lý dữ liệu theo cấu trúc phân cấp rõ ràng.
- Tương thích tốt trên desktop và tablet, phù hợp vận hành hàng ngày.
| Function description | The Classification feature on the Outlet screen allows users to categorize and organize food items/services into clear groups, making it easier to manage the menu, ensure accurate display on invoices, and support more efficient operations. |
|---|---|
| Version | v1.0 |
| Created at | Mar 30, 2026 |
| Prerequisites | The device must have a whitelisted IP address, a VPN, and a stable internet connection.The user must have a PMS account. If the user does not have an account, contact the Support team or Admin to create one.The user must be Config Outlet function. |
I. Introduction and Objectives
1. Introduction
The Classification feature on the Classification sub-tab (Outlet screen) in the PMS allows users to configure and categorize food items/services based on a hierarchical structure from Business Area → Outlet → Parent Class → Child Class, helping organize menu data logically, support accurate bill display, and optimize operations.
2. Objectives
- Enable management and classification of food items/services in a clear structure.
- Support accurate information display on invoices.
- Optimize menu management by outlet and business area.
- Provide a standardized data foundation for related modules (order, reporting, operations).
II. Primary features
- Classification Structure Management:
- Displays classification in a hierarchical structure: Business Area (FnB, KTV, Spa) > Outlet > Parent Class > Child Class
- Parent Class Management:
- Create, edit, and delete parent classes.
- Information includes: Class code, Class name, Business area, Outlet, Description.
- Child Class Management:
- Create, edit, and delete child classes.
- Information includes: Business area, Outlet, Parent class, Priority order, Class code, Class name, Description, Service.
- Assign Services to Child Class:
- Displays food items/services as a checkbox list.
- Allows selecting multiple services to assign to a child class.
- Search and Quick Actions:
- Search classification by name or code.
- Action buttons: Save, Delete, Add Parent, Add Child.
- Data Synchronization and Control:
- Ensure services are correctly assigned to child classes.
- Data is consistently used across modules such as order, billing, and reporting.
III. Basic operations on the screen
Follow the steps below in order to ensure efficient and accurate operation.
- Access the Menu Screen
- Log in to the PMS system.
- Click the “Config” menu on the header bar.
- Select Business area > FnB > Classification.
- The system displays the Classification screen.
- View classification list:
- The list is displayed in a hierarchical structure: Business Area (FnB, KTV, Spa) > Outlet > Parent Class > Child Class.
- Click an item to view details.
- Create Parent Class:
- Click Add Parent.
- Enter: Class code, Class name, Business area, Outlet, Description.
- Click Save to store.
- Create Child Class:
- Select the corresponding Parent Class.
- Click Add Child.
- Enter: Business area, Outlet, Parent class, Priority order, Class code, Class name, Description.
- Select services via checkbox.
- Click Save to store.
- Edit Classification:
- Select the parent or child class to edit.
- Update information in the detail form.
- Click Save to apply changes.
- Delete Classification:
- Select the parent or child class to delete.
- Click Delete and confirm the action.
- Search:
- Enter keywords in the Search field to quickly filter the list.
IV. GUI Description (User Interface)
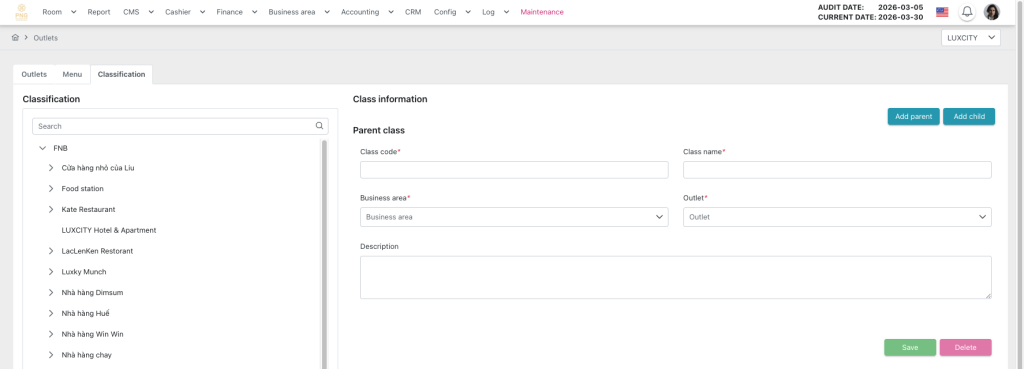
H.1.2. The add new parent class screen
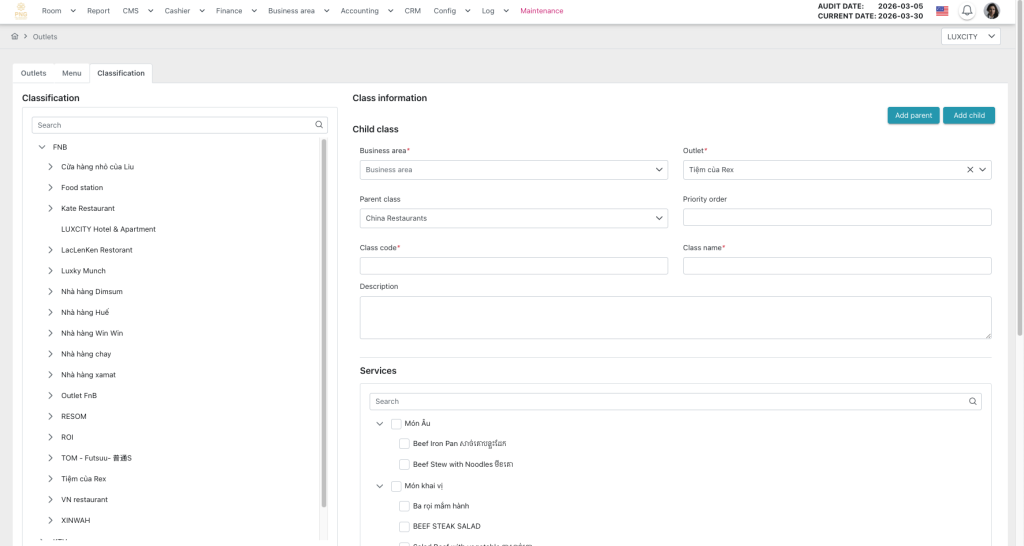
H.1.3. The add new child class screen
Hall plan screen overview
- Header
- Displays the current audit date and the main functions of the screen, such as menu navigation and quick access to transaction management actions.
- Classification List Area:
- Displays a tree structure from Business Area to Service.
- Allows expand/collapse at each level.
- Supports quick selection to view details.
- Detail Form Area:
- Displayed when selecting or creating a Parent/Child Class.
- For Parent Class:
- Class code: Unique identifier for the Parent Class used for management.
- Class name: Name representing the group of food/services.
- Business area: Business domain (e.g., FnB, KTV, Spa).
- Outlet: Store/branch where the class is applied.
- Description: Additional notes describing the class.
- For Child Class:
- Business area: Business domain of the child class.
- Outlet: Store/branch where the class is applied.
- Parent class: The parent classification group.
- Priority order: Display order priority in the list.
- Class code: Unique identifier for the child class.
- Class name: Name representing the specific group.
- Description: Additional notes.
- Service (checkbox list): List of food/services allowing multiple selections to assign to the child class.
- Action Buttons Area:
- Add Parent: Create a new parent class.
- Add Child: Create a new child class under the selected parent.
- Save: Save changes when creating or editing.
- Delete: Delete the selected parent or child class (with confirmation popup).
- Search: Quickly search by name for easy lookup and management.
- System Status and Feedback:
- Displays notifications for successful or failed add/edit/delete actions.
- Confirmation popup appears when deleting.
- Validation messages appear directly on input fields.
- User-Friendliness and Experience Optimization:
- Intuitive and easy-to-use interface.
- Clear hierarchical data management.
- Optimized for both desktop and tablet, suitable for daily operations.
V. General Instructions and Support
- Usage tips:
- Always carefully check the figures before and during running Night Audit.
- Ensure that all mandatory steps have been completed.
- Support: If you encounter a problem, contact email support@airfeedkh.com.
- Updates: This guideline may change. Please check the latest version in the “Help” section.