Access control
English below
| Chức năng (Function description) | Chức năng Screen guideline – Config > Access Control trên PMS cho phép người dùng quản lý role và phân quyền hệ thống một cách tập trung, bao gồm tạo mới, cập nhật và xoá role, đồng thời cấu hình tên role, phòng ban, mô tả và thiết lập quyền truy cập/thao tác chi tiết cho từng màn hình chức năng thông qua cơ chế checkbox, giúp kiểm soát quyền người dùng linh hoạt, rõ ràng và phù hợp với mô hình vận hành. |
|---|---|
| Phiên bản (Version) | v1.0 |
| Ngày tạo (Created at) | Mar 18, 2026 |
| Điều kiện sử dụng (Prerequisites) | Thiết bị đã được whitelist IP address, có VPN và có kết nối mạng ổn địnhĐã có tài khoản đăng nhập vào PMS. Trường hợp người dùng chưa có tài khoản, cần liên hệ Support team hoặc Admin để tạo tài khoản.Người dùng đã được phân quyền sử dụng chức năng Config access control |
I. Giới Thiệu và Mục Tiêu
1. Giới thiệu
Mục Screen guideline – Config > Access Control trên PMS được thiết kế nhằm cung cấp giải pháp quản lý phân quyền truy cập hệ thống theo role (vai trò) một cách tập trung và linh hoạt. Thông qua màn hình này, hệ thống cho phép định nghĩa các vai trò người dùng gắn với phòng ban và thiết lập quyền truy cập chi tiết đến từng module chức năng, giúp đảm bảo việc vận hành đúng vai trò, đúng quyền hạn và tăng cường tính bảo mật trong toàn hệ thống.
2. Mục tiêu
- Cho phép quản lý kiểm soát truy cập trong hệ thống một cách tập trung, bao gồm tạo mới, cập nhật và xoá quản lý truy cập.
- Hỗ trợ thiết lập phân quyền truy cập chi tiết theo từng chức năng/màn hình như Dashboard, Booking, Room, Report, CMS, Housekeeping, Finance, FNB, Warehouse, AR, Config, Log, KTV, Spa, Business Area.
- Đảm bảo kiểm soát quyền truy cập rõ ràng theo từng phòng ban và vai trò, hạn chế sai sót trong vận hành.
- Tăng cường tính bảo mật và phân tách trách nhiệm (segregation of duties) trong hệ thống PMS.
- Hỗ trợ hệ thống vận hành linh hoạt theo mô hình tổ chức của khách sạn/nhà hàng, dễ dàng mở rộng và tùy chỉnh khi cần.
- Đảm bảo tính nhất quán và đồng bộ dữ liệu phân quyền, phục vụ kiểm tra, audit và quản lý hệ thống hiệu quả.
II. Các Tính Năng Chính
- Quản lý access control (vai trò) trong hệ thống: Cho phép tạo mới, chỉnh sửa và xóa các role nhằm phục vụ việc phân quyền người dùng theo từng vị trí và chức năng trong tổ chức.
- Thiết lập thông tin role: Hỗ trợ cấu hình các thông tin cơ bản của role bao gồm tên role, phòng ban cấp trên và mô tả, giúp phân loại và quản lý vai trò một cách rõ ràng, có hệ thống.
- Phân quyền truy cập theo chức năng: Cho phép thiết lập quyền truy cập và thao tác chi tiết trên từng module/màn hình của PMS (Dashboard, Booking, Room, Report, CMS, Housekeeping, Finance, FNB, Warehouse, AR, Config, Log, KTV, Spa, Business Area) thông qua cơ chế checkbox trực quan.
- Kiểm soát phạm vi truy cập: Đảm bảo mỗi role chỉ được phép truy cập và thao tác trên các chức năng được cấp quyền, giúp tăng cường bảo mật và hạn chế sai sót trong quá trình vận hành.
- Hiển thị danh sách access control: Cung cấp danh sách toàn bộ các access control đã được cấu hình trong hệ thống, hỗ trợ người dùng dễ dàng theo dõi và quản lý.
- Cập nhật thông tin role linh hoạt: Cho phép chỉnh sửa nhanh thông tin và phân quyền của access control thông qua form chi tiết, đảm bảo khả năng điều chỉnh kịp thời theo nhu cầu vận hành thực tế.
- Đảm bảo tính nhất quán và đồng bộ dữ liệu phân quyền: Tất cả thay đổi về role và quyền truy cập được áp dụng đồng bộ trên toàn hệ thống, phục vụ hiệu quả cho việc kiểm soát, vận hành và audit.
III. Các Bước Thao Tác Cơ Bản Trên Màn Hình
Dưới đây là các bước thao tác tiêu chuẩn để sử dụng chức năng. Thực hiện theo thứ tự để đảm bảo hiệu quả.
- Truy cập màn hình Access control:
- Đăng nhập vào hệ thống PMS.
- Nhấn vào menu “Config” trên thanh Header. Nhấn vào sub-tab “Access control”.
- Hệ thống sẽ điều hướng người dùng đến màn hình Access control.
- Xem danh sách Access Control:
- Hệ thống hiển thị danh sách các cấu hình phân quyền (access control) theo từng role.
- Người dùng có thể theo dõi danh sách và xác định các quyền đã được thiết lập.
- Chỉnh sửa Access Control:
- Nhấn vào một item role trong danh sách để mở form Access Control Details.
- Hệ thống hiển thị toàn bộ thông tin role và các quyền truy cập tương ứng.
- Cập nhật thông tin và phân quyền:
- Chỉnh sửa các thông tin như: tên role, phòng ban, mô tả nếu cần.
- Thiết lập lại quyền truy cập/thao tác trên các module bằng cách chọn/bỏ chọn checkbox trong các mục: Dashboard, Booking, Room, Report, CMS, Housekeeping, Finance, FNB, Warehouse, AR, Config, Log, KTV, Spa, Business area.
- Lưu thay đổi:
- Nhấn Save để cập nhật cấu hình access control.
- Hệ thống áp dụng quyền mới ngay sau khi lưu thành công.
- Kiểm tra và đồng bộ:
- Kiểm tra lại danh sách để đảm bảo quyền đã được cập nhật đúng.
- Đảm bảo các thay đổi được áp dụng chính xác trên các màn hình chức năng tương ứng trong hệ thống PMS.
IV. Mô Tả GUI (Giao Diện Người Dùng)

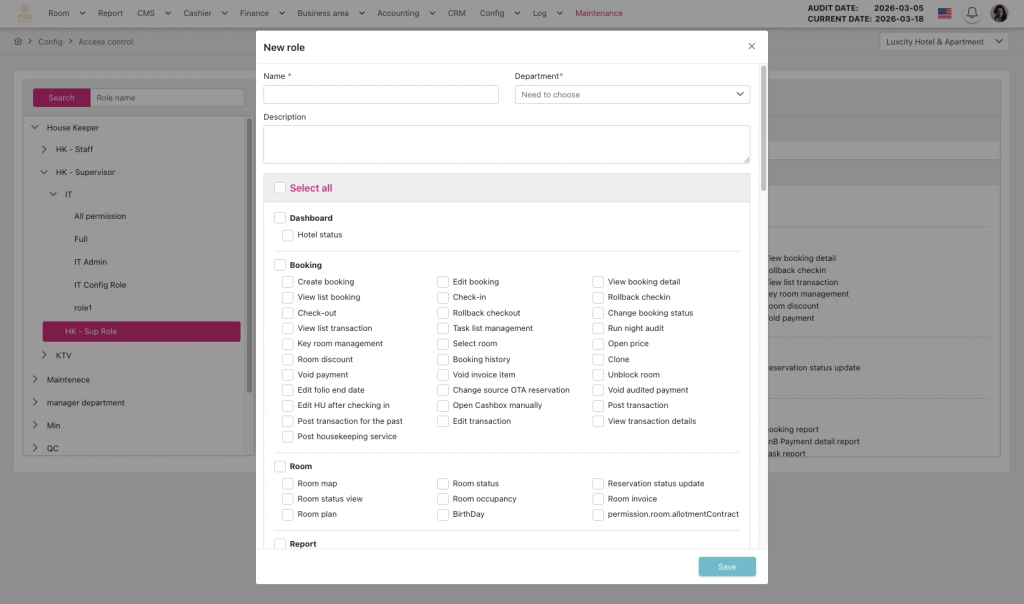
H.1.0. Màn hình tạo mới access control

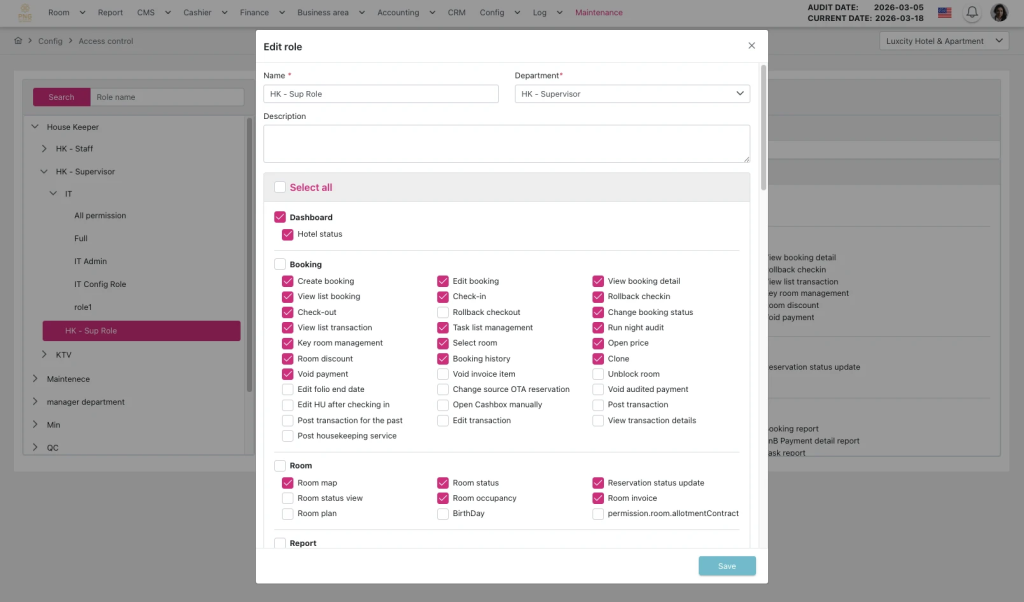
H.1.1. Màn hình chỉnh sửa access control
Màn hình Access control gồm:
- Header:
- Hiển thị thông tin ngày audit hiện tại và các chức năng chính của màn hình như điều hướng menu, truy cập nhanh các thao tác quản lý hóa đơn.
- Danh sách Access Control (Role List):
- Bố trí ở bên trái màn hình, hiển thị toàn bộ các role đã cấu hình trong hệ thống.
- Mỗi item hiển thị tên role, phòng ban.
- Các role được cấu hình trong tab Departure > Employee > Config, không thể xóa hoặc chỉnh sửa nhằm đảm bảo tính toàn vẹn dữ liệu.
- Người dùng có thể click trực tiếp vào từng role để mở form chi tiết và chỉnh sửa quyền truy cập.
- Hỗ trợ tìm kiếm nhanh theo tên role và cuộn danh sách để theo dõi đầy đủ.
- Khu vực chi tiết Access Control (Access Control Details):
- Xuất hiện khi người dùng chọn một role từ danh sách.
- Hiển thị các thông tin cơ bản của access control, gồm:
- Role Name: Tên đầy đủ của role.
- Description: Mô tả chi tiết về chức năng và phạm vi của role.
- Danh sách màn hình có thể truy cập
- Cho phép người dùng chỉnh sửa thông tin khi nhấn vào nút “Edit” (Hình H.1.1. Màn hình chỉnh sửa access control)
- Cho phép người dùng xoá access control khi nhấn vào nút “Delete”
- Thêm mới access control:
- Xuất hiện khi người dùng nhấn vào nút “New”, popup “New role” hiện lên.
- Người dùng nhập một số thông tin để cấu hình access control mới, gồm:
- Name: Thiết lập tên access control.
- Departure: Chọn phòng ban.
- Description: Nhập mô tả.
- Khu vực phân quyền (Permission Settings):
- Hiển thị dưới dạng checkbox list, cho phép đánh dấu các quyền truy cập và thao tác trên từng module chức năng trong PMS.
- Checkbox “Select all”: Nhấn vào để thao tác nhanh đánh dấu quyền truy cập và thao tác tất cả các module chức năng trong PMS.
- Danh sách quyền truy cập module bao gồm các mục chính:
- Danh sách các module bao gồm các mục chính: Dashboard, Booking, Room, Report, CMS, Housekeeping, Finance, FNB, Warehouse, AR, Config, Log, KTV, Spa, Business area.
- Người dùng có thể chọn/bỏ chọn các checkbox để cấp quyền truy cập, cho phép thao tác, xem dữ liệu hoặc báo cáo tương ứng.
- Giao diện phân quyền hỗ trợ cấp quyền chi tiết cho từng module, giúp kiểm soát linh hoạt và rõ ràng.
- Sau khi hoàn thành thiết lập, nhấn nút “Save” để lưu access control mới.
- Nút thao tác:
- New: Cho phép người dùng thêm mới access control.
- Edit: Cho phép người dùng chỉnh sửa access control sau khi đã nhấn chọn role bên danh sách access control.
- Delete: Xóa role khỏi hệ thống nếu không phải role được cấu hình trong tab Departure > Employee > Config và người dùng có quyền thao tác.
- Tính năng trực quan và thân thiện:
- Giao diện được bố trí rõ ràng, phân vùng logic: danh sách role bên trái, chi tiết và phân quyền bên phải.
- Hỗ trợ thao tác click trực tiếp, mở rộng danh sách, đánh dấu checkbox và cập nhật thông tin tức thì.
- Hỗ trợ desktop và tablet, tối ưu thao tác cho người dùng vận hành PMS hàng ngày.
- Giúp giảm thiểu lỗi cấu hình, tăng độ chính xác và tính bảo mật khi phân quyền truy cập.
- Cho phép người dùng nhìn tổng quan quyền hạn của từng role trước khi lưu, đảm bảo phân quyền rõ ràng, minh bạch và phù hợp với mô hình vận hành.
| Function description | The Screen guideline – Config > Access Control function in the PMS allows users to centrally manage roles and system permissions, including creating, updating, and deleting roles, while configuring role name, department, description, and setting detailed access and action permissions for each functional screen through a checkbox mechanism, ensuring flexible, clear, and operation-aligned user access control. |
|---|---|
| Version | v1.0 |
| Created at | Mar 18, 2026 |
| Prerequisites | The device must have a whitelisted IP address, a VPN, and a stable internet connection.The user must have a PMS account. If the user does not have an account, contact the Support team or Admin to create one.The user must be Config access control function. |
I. Introduction and Objectives
1. Introduction
The Screen guideline – Config > Access Control in PMS is designed to provide a centralized and flexible solution for managing system access permissions by role. Through this screen, the system allows the definition of user roles linked to departments and the configuration of detailed access rights for each functional module, ensuring operations are performed according to role and authority while enhancing overall system security.
2. Objectives
- Enable centralized management of system access control, including creating, updating, and deleting access configurations.
- Support detailed access permission settings for each function/screen, such as Dashboard, Booking, Room, Report, CMS, Housekeeping, Finance, FNB, Warehouse, AR, Config, Log, KTV, Spa, Business Area.
- Ensure clear access control by department and role, minimizing operational errors.
- Strengthen security and enforce segregation of duties within the PMS.
- Allow flexible system operation aligned with the organizational structure of the hotel/restaurant, with easy expansion and customization when needed.
- Ensure consistent and synchronized permission data to support auditing, inspection, and effective system management.
II. Primary features
- Access control (role) management in the system: Allows creating, editing, and deleting roles to manage user permissions according to their positions and functions within the organization.
- Role information setup: Supports configuring basic role details, including role name, parent department, and description, enabling clear and systematic classification and management of roles.
- Function-based access permissions: Allows setting detailed access and operation rights for each module/screen in the PMS (Dashboard, Booking, Room, Report, CMS, Housekeeping, Finance, FNB, Warehouse, AR, Config, Log, KTV, Spa, Business Area) through an intuitive checkbox interface.
- Access scope control: Ensures each role can only access and perform actions on authorized functions, enhancing security and minimizing operational errors.
- Access control list display: Provides a complete list of all configured access controls in the system, making it easy for users to monitor and manage roles.
- Flexible role updates: Enables quick editing of role information and permissions via a detailed form, ensuring timely adjustments according to operational needs.
- Consistency and synchronization of permission data: All changes to roles and access rights are applied system-wide, supporting effective control, operations, and auditing.
III. Basic operations on the screen
Follow the steps below in order to ensure efficient and accurate operation.
- Access the Access Control screen:
- Log in to the PMS.
- Click the “Config” menu on the header, then select the “Access Control” sub-tab.
- The system will navigate the user to the Access Control screen.
- View the Access Control list:
- The system displays all configured access controls by role.
- Users can review the list to see the permissions already assigned.
- Edit Access Control:
- Click on a role item in the list to open the Access Control Details form.
- The system shows all role information and the corresponding access permissions.
- Update role information and permissions:
- Edit fields such as role name, department, and description if needed.
- Adjust access and action permissions for modules by checking/unchecking boxes for: Dashboard, Booking, Room, Report, CMS, Housekeeping, Finance, FNB, Warehouse, AR, Config, Log, KTV, Spa, Business Area.
- Save changes:
- Click Save to update the access control configuration.
- The system applies the new permissions immediately after saving.
- Verify and synchronize:
- Review the list to ensure permissions have been updated correctly.
- Ensure changes are accurately applied across all corresponding functional screens within the PMS.
IV. GUI Description (User Interface)
H.1.0. Create new access control screen
H.1.0. Edit access control screen
Access control screen include:
Header:
- Displays the current audit date and main functions of the screen, such as menu navigation and quick access to access control management actions.
Access Control List (Role List):
- Located on the left side of the screen, showing all roles configured in the system.
- Each item displays the role name and associated department.
- Roles configured in Departure > Employee > Config are default and cannot be deleted or edited to ensure data integrity.
- Users can click directly on any role to open the detailed form and edit access permissions.
- Supports quick search by role name and scroll functionality to view the full list.
Access Control Details Area:
- Appears when a role is selected from the list.
- Displays the basic information of the access control, including:
- Role Name: Full name of the role.
- Description: Detailed description of the role’s functions and scope.
- Lists the screens/modules the role can access.
- Allows editing of role information when clicking the Edit button (see Figure H.1.1 – Access Control Edit Screen).
- Allows deleting the access control when clicking the Delete button.
Adding a New Access Control:
- Appears when the user clicks New, opening a “New Role” popup.
- Users enter information to configure a new access control, including:
- Name: Set the name of the access control.
- Department: Select the department.
- Description: Enter a description.
Permission Settings Area:
- Displayed as a checkbox list, allowing selection of access rights and actions on each PMS module.
- Select All checkbox: Allows quickly selecting all access and actions across all modules.
- Main modules include: Dashboard, Booking, Room, Report, CMS, Housekeeping, Finance, FNB, Warehouse, AR, Config, Log, KTV, Spa, Business Area.
- Users can select/deselect checkboxes to grant access, allow actions, or view corresponding data/reports.
- The interface supports detailed permission assignment for each module, providing flexible and clear control.
- After completing the setup, click Save to store the new access control.
Action Buttons:
- New: Add a new access control.
- Edit: Edit an access control after selecting a role from the list.
- Delete: Remove a role if it is not a default role configured in Departure > Employee > Config and if the user has permission.
User-Friendly and Intuitive Features:
- The interface is clearly structured with logical zones: role list on the left, details and permissions on the right.
- Supports direct clicking, expanding lists, checking/unchecking boxes, and instant updating of information.
- Optimized for desktop and tablet, facilitating daily PMS operations.
- Reduces configuration errors, improves accuracy, and enhances security in access control.
- Allows users to review each role’s permissions before saving, ensuring clear, transparent, and operationally appropriate access control.
V. General Instructions and Support
- Usage tips:
- Always carefully check the figures before and during running Night Audit.
- Ensure that all mandatory steps have been completed.
- Support: If you encounter a problem, contact email support@airfeedkh.com.
- Updates: This guideline may change. Please check the latest version in the “Help” section.