HM – 5143 [UPDATE] Outlet – Config transaction type in Selector group
Currently, the hotel can only view statistics for general transaction types because it has configured a common transaction type for all products/services.
→ The hotel wants to see a statistical report of each type of transaction for each outlet.
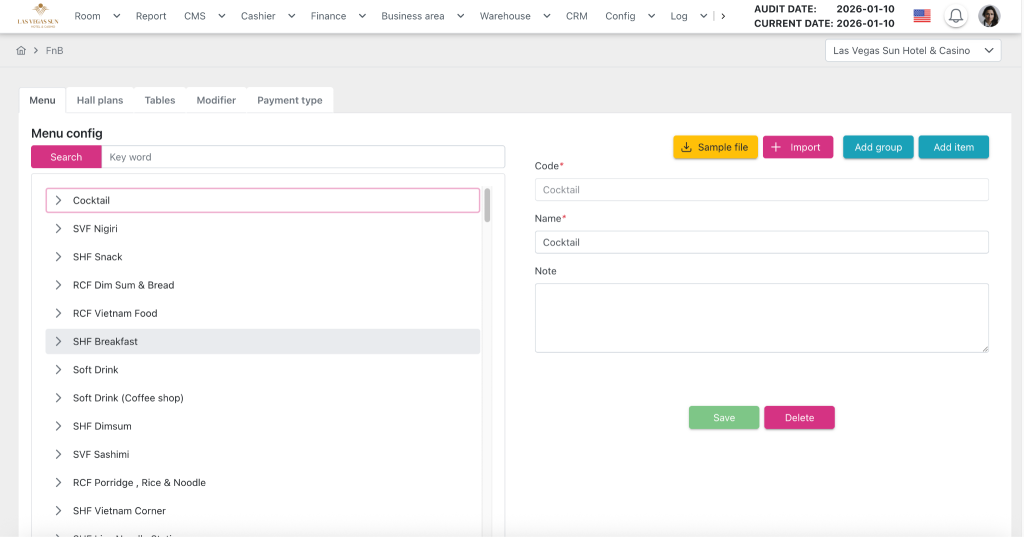
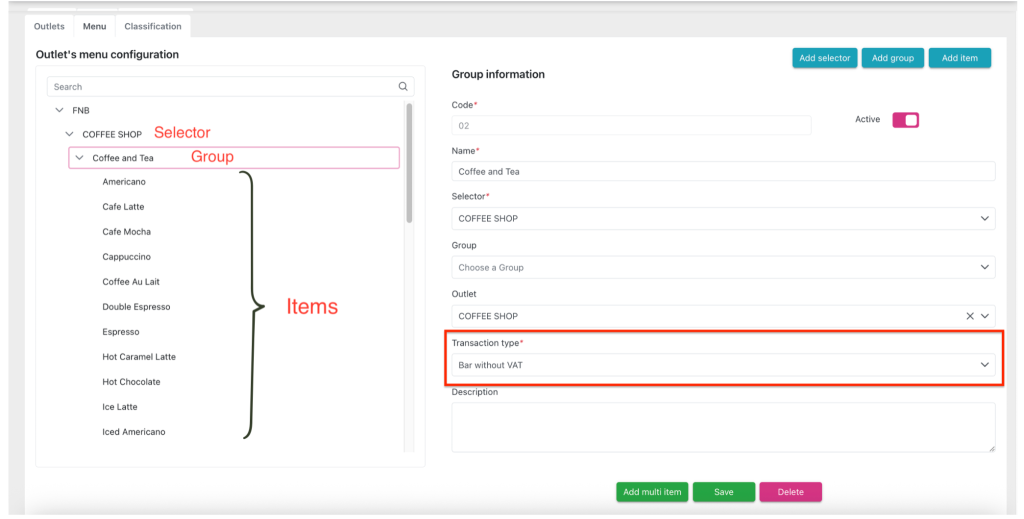
In the Config > Business area > Outlets > Menu tab screen, add the “Transaction type” droplist to the Selector group information screen when a user adds/edits a Selector group.
When the user clicks on the “Transaction type” droplist, all configured transaction types are displayed in the Config > Currency > Transaction tab screen.
The selector item will use the transaction type configured for the most recent group selector to save and display data in the report.
* Item type belongs to Discount/Surcharge or Modifier Group is applied for Service type ( Food/ Drink items)
→ Add transaction type for these group is no meaning and no display on Reports
3. On the Business Area item revenue reporting screens, display the correct transaction type value that the user configured in the Group selector screen.
Display the correct transaction type value configured in the group selector on the hotel revenue statistics report screens and Business area item screens:
- Hotel revenue detail report
- Revenue exclude tax
- Revenue include tax
- Night audit report
- Total transaction report
- FnB/ KTV/ SPA daily revenue report
4. Update the Selector item configuration screen
In the Config screen > Business area > Outlets > Menu tab, when a user creates/edits an item belonging to the selector with Business area = “ FnB ”,
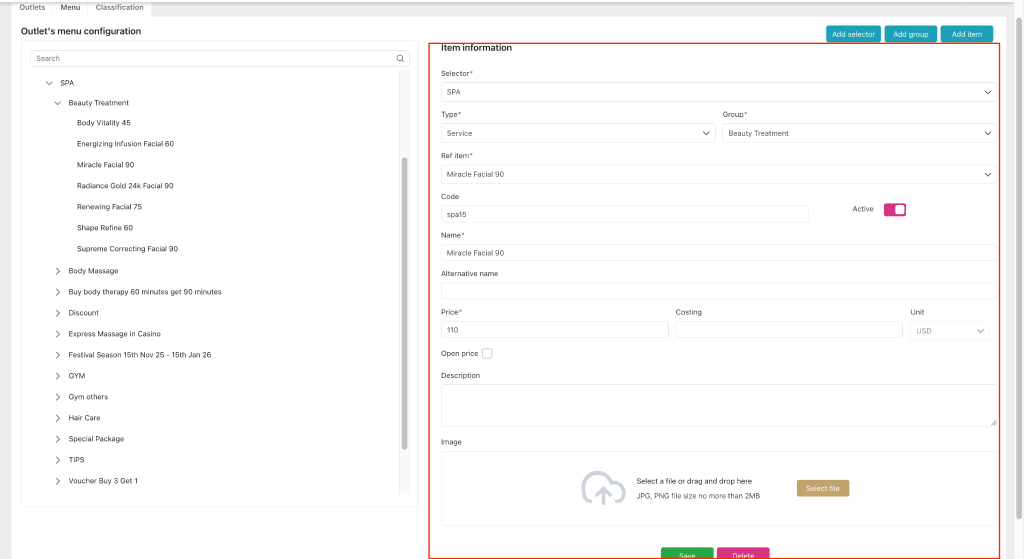
Add the following components:
- Price (Textbox): The price of the service after tax. Allows users to enter decimal numbers, with a maximum of 10 digits before the decimal point and 2 digits after the decimal point. Null and negative numbers are not allowed. By default, the value is displayed as configured in the Config > Business area > FnB > Menu tab screen.
- Costing (Textbox): Service cost. Allows users to enter a decimal string of characters, up to 20 characters, with null allowed. By default, the configured value is displayed in the Config > Business area > FnB > Menu tab screen.
- Unit (Droplist): Currency unit. Displayed in a disabled state, preventing user editing. By default, it displays the primary currency configured in the Config > Hotel screen. By default, it displays the value configured in the Config > Business area > FnB > Menu tab screen.
- Open Price (Checkbox): This option allows price editing. If the checkbox is On, when the user selects a service on the Order Detail screen, the “Open Price” button is enabled, allowing the user to edit the service price on the Order Detail screen. If the checkbox is Off, the “Open Price” button on the Order Detail screen is disabled when the corresponding service is selected. By default, the configured value is displayed in the Config > Business Area > FnB > Menu tab.
- Open item (Checkbox): This option allows you to edit the name displayed on the bill/report. If the checkbox is On, when the user selects a service on the Order detail screen, the “Open item” button allows the user to edit the service name on the Order detail screen. If the checkbox is Off, the “Open item” button on the Order detail screen is disabled when the corresponding service is selected. By default, the configured value is displayed in the Config > Business area > FnB > Menu tab.
- Description (Textbox): Service description. Allows users to enter a string of characters, up to 1000 characters. Null is allowed. By default, the value configured in the Config > Business area > FnB > Menu tab screen is displayed.
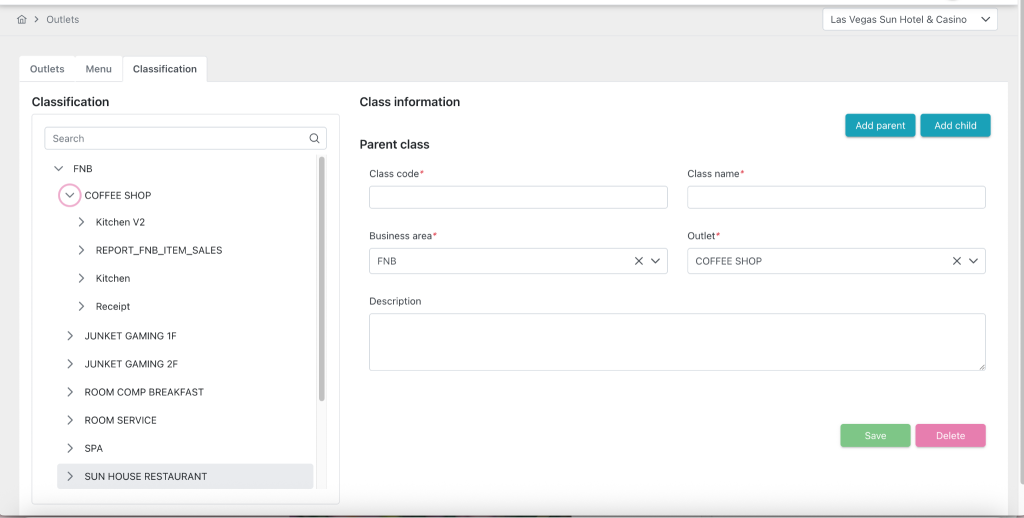
5. Update the Classification configuration screen.
Move the Classification tab screen from Config > Business area > FnB / KTV to Config > Outlets, located to the right of the Menu tab.
5.1. Config > Outlets > tab Classification > Page “Parent class”
Adding a “Business area” dropdown allows users to select a Business area to filter the value in the “Outlet” dropdown. Clicking it will display a list of options based on the Hotel’s configuration in the “Business area” section.
Add the “Outlet” dropdown to the Config > Outlets > Classification tab screen when the user configures the Parent class. This allows the user to select an outlet within the chosen Business area to configure the Parent class and the scope of the outlet item for the Child classification. If the user has not selected an option in the “Business area” dropdown, the option in the “Outlet” dropdown will not be displayed.
5.2. Config > Outlets > tab Classification > Page “Child class”
Adding a “Business area” dropdown allows users to select a Business area to filter the value in the “Outlet” dropdown. Clicking it will display a list of options based on the Hotel’s configuration in the “Business area” section.
Add the “Outlet” dropdown to the Config > Outlets > Classification tab screen when the user configures the Parent class. This allows the user to select an outlet within the chosen Business area to configure the Parent class and the scope of the outlet item for the Child classification. If the user has not selected an option in the “Business area” dropdown, the option in the “Outlet” dropdown will not be displayed.
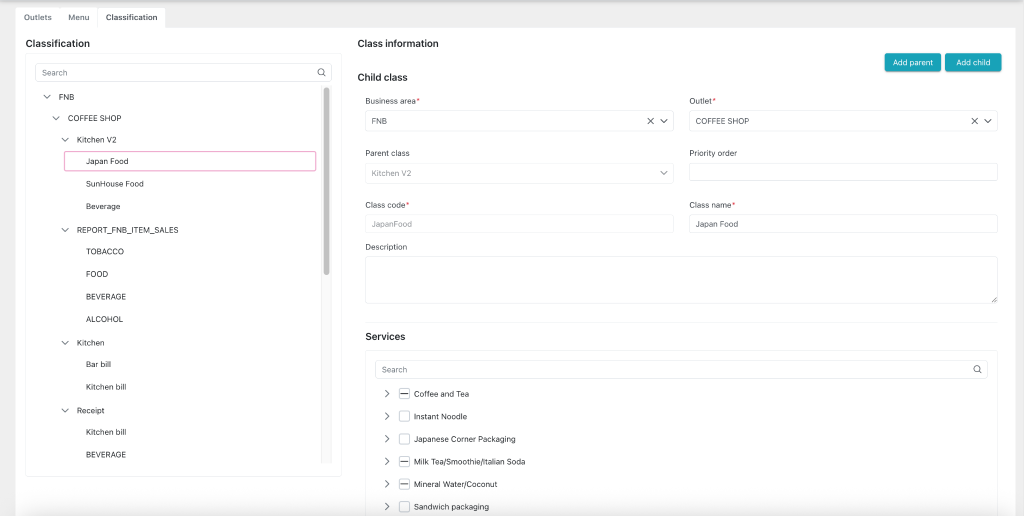
In the “Service” dropdown menu on the Config > Outlets > Classification tab, when the user configures the Child class, the outlet items belonging to the outlet set in the Parent class are displayed, allowing the user to select them for configuration.
When the task is uploaded to the production environment, it’s necessary to automatically migrate the outlet items set from the corresponding service, which will then be referenced and set up for the old data.
Related screens:
- Food and Beverage Report :
- FnB daily revenue report: Revenue breakdown
- FnB payment report: Revenue breakdown
- FnB payment detail report: Revenue breakdown
- FnB menu item sales report
- F&B / KTV Bill Display Screen :
- The “Final bill”/”Post to room bill” form appears when opened from the Bill list/Invoice list screen.
- Form “Pre-check bill”/ “Final bill”/ “Split bill”/ “Post to room bill”